This section explains how to register the LINE channel information you set up in step 1 into the Shopify app “CRM PLUS on LINE”.
If you haven’t set up your LINE Official Account, please check the section below.
The setup screens differ depending on your CRM PLUS on LINE subscription plan.
If you are using the Free to Expert Plan, refer to the section “CRM PLUS on LINE: For Free to Expert Plan Users".
If you are using the Advanced Plan, refer to the section “CRM PLUS on LINE: For Advanced Plan Users”.
⚠️ The steps in 1. LINE Login Channel Setup and 3. Messaging API Channel Setup may appear similar, but they are different. Please be careful not to confuse them when performing the setup.
Log in to LINE Developers.
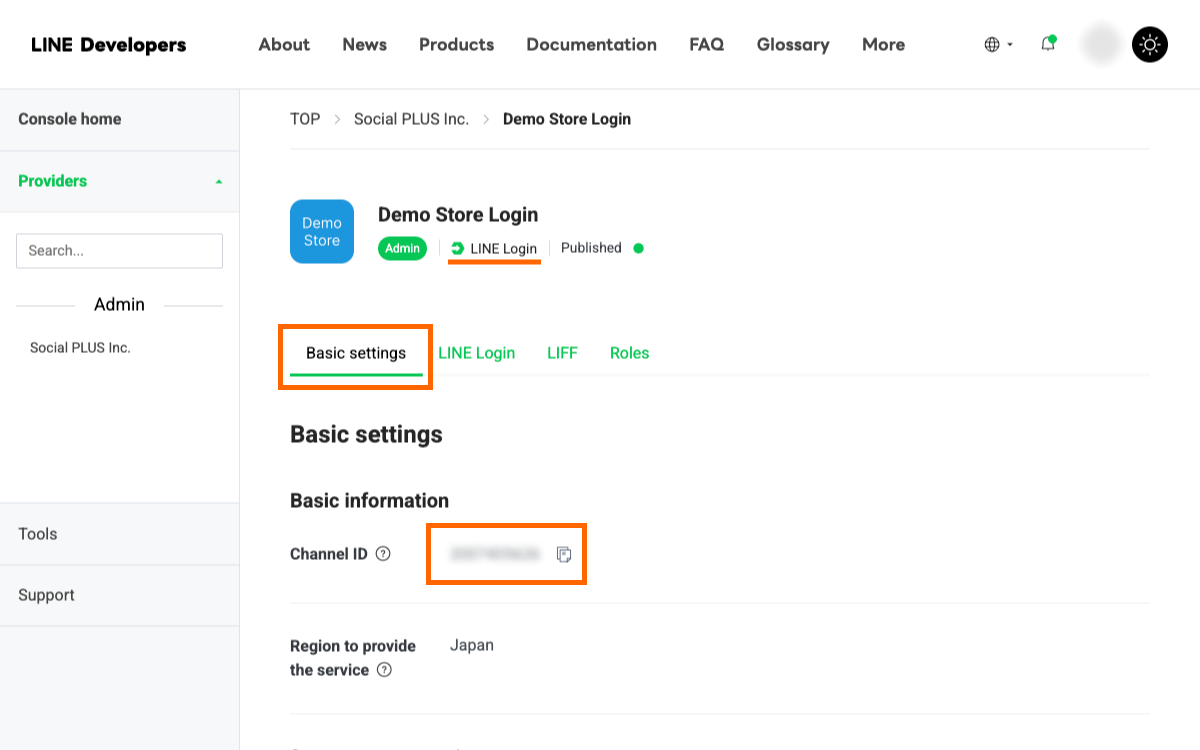
Open the "Basic settings" tab of the LINE Login channel and copy the "Channel ID".
Log in to your Shopify store.
In the CRM PLUS on LINE app, go to Home > Configuring LINE Channels > LINE Login Channel Settings, and paste it into the “Channel ID” field.

Return to LINE Developers, open the "Basic settings" tab of the LINE Login channel, and copy the "Channel secret".

Then go back to the CRM PLUS on LINE app admin screen, and paste the "Channel secret" into the "LINE Login Channel Settings" section.

Next, copy the "Callback URL" from the "LINE Login Channel Settings" section in the app.

Return to LINE Developers, open the "LINE Login" tab, and click the "Edit" button next to "Callback URL".

Paste the copied "Callback URL" into the field and click "Update".

Return to the CRM PLUS on LINE app admin screen and choose how to configure the "Auto Add Friends Settings".
If your CRM PLUS on LINE plan is Free to Expert, select "A confirmation screen for adding friends will be displayed after you agree to the authorization screen. (Recommended for Non Advanced plans)".

Return to LINE Developers, open the "Basic settings" tab of the Messaging API channel, and copy the "Channel ID".

Then go back to the CRM PLUS on LINE app admin screen, and paste the "Channel ID" into the "Messaging API Channel Settings" section.

Return to LINE Developers again, and in the "Basic settings" tab, copy the "Channel secret".

Then go back to the CRM PLUS on LINE app admin screen, and paste the "Channel secret" into the "Messaging API Channel Settings" section.

This setting is only required if you plan to use the CRM PLUS on LINE chat feature.
If you do not use this feature, skip this section and proceed to Issue a Password for “Message Manager”.
Note: If you are using the chat feature in LINE Official Account Manager or a third-party messaging/chat tool, this setting should also be skipped.
Note: Conversations that take place on LINE before the Webhook is turned on will not be carried over to Social PLUS’s Message Manager.
First, copy the "Webhook URL".

Return to LINE Developers, open the "Messaging API" tab, and click the "Edit" button next to "Webhook URL".

Paste the previously copied Webhook URL into the field, then click "Update".
Note: Only one Webhook URL can be registered. If a Webhook URL is already registered, it may be in use by another tool.

Enable both "Use webhook" and "Webhook redelivery".
Note: Enabling "Webhook redelivery" allows the LINE platform to resend the webhook after a short interval if it fails to be received for any reason.

Return to the CRM PLUS on LINE admin screen and click the "Save" button.
You have now completed the LINE channel settings.

Log in to LINE Developers.
Open the "Basic settings" tab of the LINE Login channel and copy the "Channel ID".
Log in to your Shopify store.
In the CRM PLUS on LINE app, go to Home > Display social login buttons in your store > Social Login Settings, click “LINE”, and paste it into the “Channel ID” field under “LINE Login Channel Settings”.
Return to LINE Developers, open the "Basic settings" tab of the LINE Login channel, and copy the "Channel secret".
Then go back to the CRM PLUS on LINE app admin screen, and paste the "Channel secret" into the "LINE Login Channel Settings" section.
Next, copy the "Callback URL" from the "LINE Login Channel Settings" section in the app.
Return to LINE Developers, open the "LINE Login" tab, and click the "Edit" button next to "Callback URL".
Paste the copied "Callback URL" into the field and click "Update".
Return to the CRM PLUS on LINE app admin screen and choose how to configure the "Auto Add Friends Settings".
To select "A checkbox for adding friends is displayed at the top of the authorization screen. (Recommended for Advanced Plan)", you must be on the CRM PLUS on LINE Advanced Plan and apply for this feature through an authorized agency.If you wish to use this option, please contact our support team.
Before applying for the feature, please select "A confirmation screen for adding friends will be displayed after you agree to the authorization screen. (Recommended for Non Advanced plans)".

Return to LINE Developers, open the "Basic settings" tab of the Messaging API channel, and copy the "Channel ID".
Then go back to the CRM PLUS on LINE app admin screen, and paste the "Channel ID" into the "Messaging API Channel Settings" section.
Return to LINE Developers again, and in the "Basic settings" tab, copy the "Channel secret".
Then go back to the CRM PLUS on LINE app admin screen, and paste the "Channel secret" into the "Messaging API Channel Settings" section.
This setting is only required if you plan to use the CRM PLUS on LINE chat feature.
If you do not use this feature, skip this section and proceed to Issue a Password for “Message Manager”.
Note: If you are using the chat feature in LINE Official Account Manager or a third-party messaging/chat tool, this setting should also be skipped.
Note: Conversations that take place on LINE before the Webhook is turned on will not be carried over to Social PLUS’s Message Manager.
First, copy the "Webhook URL".
Return to LINE Developers, open the "Messaging API" tab, and click the "Edit" button next to "Webhook URL".
Paste the previously copied Webhook URL into the field, then click "Update".
Note: Only one Webhook URL can be registered. If a Webhook URL is already registered, it may be in use by another tool.
Enable both "Use webhook" and "Webhook redelivery".
Note: Enabling "Webhook redelivery" allows the LINE platform to resend the webhook after a short interval if it fails to be received for any reason.
Return to the CRM PLUS on LINE admin screen and click the "Save" button.
You have now completed the LINE channel settings.
Let’s move on to the next setting!
 Encourage ID Linking on My Page
 Encourage LINE ID Linking on the Post-Purchase Thank You Page
 Display a Banner on Your Online Store to Encourage LINE ID Linking
If the feature does not work as expected after setup, please refer to our Troubleshooting page (Japanese) for more information.
If you have any questions, feel free to contact our support team.
Support contact: support@socialplus.jp
Please feel free to contact us with any questions or concerns about CRM PLUS on LINE.
